O sistema de aprovação de ausências permite-lhe criar um fluxo personalizável para a aprovação de pedidos de ausências apresentados pelos seus colaboradores. Com este sistema, pode definir um processo de aprovação que garante que todos os pedidos são analisados e aprovados atempadamente.
Onde encontrar as aprovações de ausências?
- Na sua barra lateral, aceda a Configurações
- Na secção Tempo, clique em Gestão de ausências
- Uma vez lá, desloque-se para baixo até encontrar Aprovação de ausências

Como criar uma aprovação de ausência
Por defeito, todos os colaboradores são atribuídos ao "Time off default approval group" (Grupo predefinido de aprovação de ausências) criado pela Fatorial.
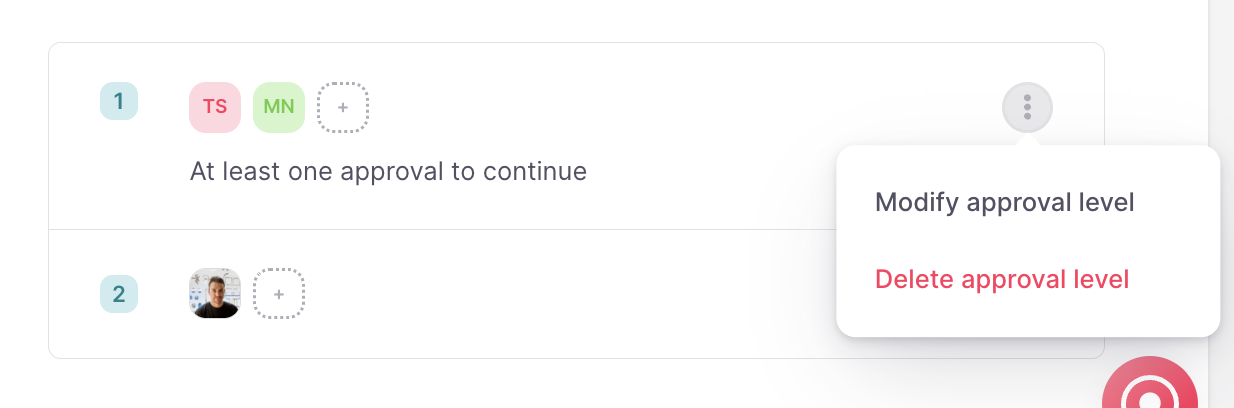
Não é possível eliminar o grupo de aprovação predefinido, mas é possível editá-lo clicando no ícone dos três pontos.

- Na secção Aprovação de ausências, clique em Adicionar novo grupo de aprovação
- Defina um nome e uma descrição (opcional)
- Se assinalar Grupo de aprovação automática, as ausências dos colaboradores dentro do grupo serão aprovadas automaticamente
- Clique em Guardar grupo de aprovação

Defina o grupo de aprovação:
Por defeito, o aprovador de ausências é o aprovador do primeiro nível de aprovação.
O fluxo de aprovação de ausências está estruturado em níveis:
- Um ou mais aprovadores são atribuídos a cada nível
- Para passar para o nível seguinte, os aprovadores do nível anterior devem aprovar o pedido
Para alterar o aprovador de tempos no primeiro nível:
- Clique para abrir o fluxo de aprovação
- Clique nos três pontos para editar o nível de aprovação
- Selecionar o novo aprovador para o primeiro nível

Para criar um novo nível de aprovação:
- Clique em Adicionar nível de aprovação
- Seleccione o tipo de Aprovador e o Aprovador
- Clique em Guardar nível de aprovação
- Clique em Guardar alterações , localizado no canto superior direito

💡 Para adicionar outros aprovadores ao mesmo nível de aprovação, basta clicar no ícone de mais.
Para modificar ou eliminar o nível de aprovação, basta clicar no ícone dos três pontos.
Adicionar colaboradores
Uma vez definido o fluxo de aprovação, está pronto para atribuir os colaboradores:
- Vá para o separador Colaboradores
- Clique no Adicionar colaboradores
- Seleccione os colaboradores
- Clique em Guardar
