Ensure that your employees take the required breaks by law while also making sure they don't take excessively long breaks. Compliance with labor laws and maintaining productivity are top priorities
How to add breaks
You have two options to add breaks
1. Adding breaks in Time Categories
- On your sidebar, go to Settings → Time
- Click on Time Categories
- Scroll down until Break types
- Click on “New break type”
- A pop-up modal will appear:
- Write down the name of the break you are creating
- Choose the type: Paid break, or Unpaid break
- Click on Save

Breaks types cannot be deleted, they can only be archived. This is irreversible and its name cannot be reused for new break types.
2. Adding breaks in Automatic breaks
- Go to Settings → Time Tracking
- Select the time tracking policy where you want to add breaks
- Click on the Break tab and scroll down until the automatic break section
- You can create a new break directly from this section by clicking New Break (available to users with the relevant permissions)
- When creating a break, specify:
- Name and description
- Whether the break is Paid or Unpaid
- Save the break
- Apply it to the corresponding rule

To be able to see this button, the “Create and archive breaks” permission have to be enabled.
3. Adding breaks to shifts
Add multiple breaks to shifts. Indicating if they are paid or not
If you want to add a break to an existing shift:
- Select the shift you want to add breaks
- Click Edit shifts in the upper right corner
- In the Shift section, click on add breaks
- Select the break you previously created
- Choose between:
- Flexible
- Semiflexible: breaks with a duration
- Fixed: breaks with a specific start and end time
- Click on edit shift to save

4. Add break in a fixed work schedule
- On your sidebar, go to settings → Work schedules
- Select a fixed schedule or create a new one
- Add the break
- Click Save button

On the first line, list all the working hours the employee must complete, and on the second line, specify the duration of the break
Enable manual breaks in Time Tracking
- Go to Settings
- Scroll down until Time
- Select Time Tracking
- Choose the policy you want to add manual breaks
- Click on the Breaks section
- Enable breaks
All the breaks you have created will appear here, enable the ones you want

Activate alerts, reminders, and automatic break corrections
You can set up break reminders based on how long someone has been working–and automatically correct missing or insufficient breaks to match company rules.
When Break alerts, reminders, and corrections are enabled, employees will get a reminder to take a break after working a set amount of time. If they skip the break or take one that’s too short, they’ll be notified when clocking out. If automatic corrections are activated, their timesheet will also be adjusted to meet the defined rules.
How to Configure
Minimum break duration
Set the shortest break that should count as valid.
- If set to 0h 0min, all breaks count—no matter how short.
- Example: If you set it to 0h 15min, only breaks of 15 minutes or more will be considered.
Work time ➝ Break duration rules
Define when and how long breaks should be:
- Example: “After 6 hours of work, take a 30-minute break.”
- You can add up to three rules (e.g., after 6h, after 9h).
- To turn off this feature, leave both values at 0h 0min.
Automatic corrections
Choose whether breaks that don’t meet the above mentioned rules should be corrected automatically in the timesheet. Employees will see an alert at clock-out showing how many minutes will be deducted to stay compliant.
Save your changes
Click Save changes to apply your setting

Enable automatic breaks in Time Tracking
- Go to Settings
- Scroll down until Time
- Select Time Tracking
- Choose the policy where you want to add manual breaks
- Click on the Breaks section
- Enable automatic breaks
Types of automatic breaks
With automatic breaks, Factorial adds breaks to employees' timesheets based on predefined rules. This ensures consistency and compliance without requiring employees to log breaks manually.
Automatic breaks are considered working time only if they are planned.
Break Start Options
You can choose how automatic breaks should be triggered:
-
After amount of hours: breaks are automatically added based on how much time has passed since the employee clocked in — not based on a specific time of day.
You can create up to three break rules of this type per policy. Each rule includes:- Break type: select a predefined break type (e.g. lunch, rest).
- After clock-in: define how long after clock-in the break should be triggered (e.g. 2h 0min).
- Break duration: set how long the break should last (e.g. 15 minutes).

- At planned time: breaks are automatically added at the specific times defined in the employee’s shift or work schedule. This only applies to fixed breaks with a defined start and end time.

Notifications and Saving
You can choose to notify employees about any changes to the automatic break rules by checking the notification box. Make sure to click Save changes to apply your configuration.
How to archive break types
- Click three dots next to the selected Break type, and select Archive
- Click Archive once you are sure, as this action is irreversible

How to register a break from desktop
From the Clock in widget
- From your Dashboard
- Go to the Clock-in section
- Click on Break
- Choose between the types of breaks you previously created. For example: Coffee break
- Once your break is over, click on Go back to work
Keep in mind that to register for a break you must be clocked in

From the clock in
- From your sidebar menu, go to Clock in
- Choose the day in which you want to register the break
- Click on + Add
- Select Break
- Fill in the time and the Type of break
- Click on Apply

Each registered break is visually identified on the timesheet using color-coded tags:
- Paid breaks are displayed with a lime label
- Unpaid breaks are displayed with a blue label
- When you hover over a break tag, a tooltip appears indicating:
- Whether the break is Manual or Automatic
- Whether the break is Paid or Unpaid

Adding breaks to an employee’s timesheet
- From your sidebar menu, go to Time Tracking
- Select an employee
- Choose a date, and click on + Add
- Fill in the Shift information, and add a Break
- Click on Apply
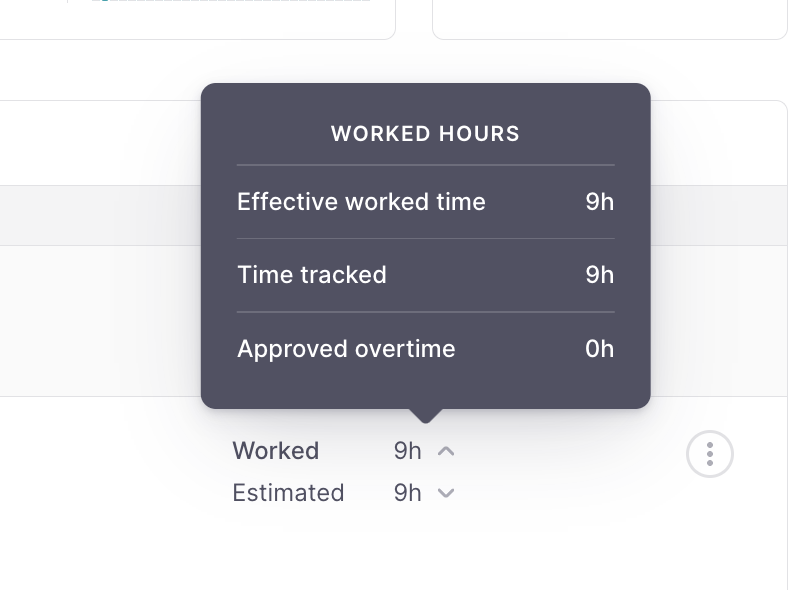
Track your employee’s effective worked time

By using Breaks in Time Tracking, you'll be able to track your employees' productive work hours and monitor the breaks that have taken.
Each registered break is visually identified on the timesheet using color-coded tags:
- Paid breaks are displayed with a lime label
- Unpaid breaks are displayed with a blue label
- When you hover over a break tag, a tooltip appears indicating:
- Whether the break is Manual or Automatic
- Whether the break is Paid or Unpaid
How to register a break from your mobile app
- From the Clock-in section
- Click on Break
- Choose between the types of breaks you previously created. For example: Coffee break
- Once your break is over, tap on Resume to get back to work

The employee will get an alert if the break doesn’t comply with the defined policy.